CAMERA SENSOR CLEANING
If you're using an SLR camera, you'll eventually encounter spots due to a dirty camera sensor. If it hasn't happened yet, don't worry — it will. When it does, you'll need to know if what you're seeing is indeed from sensor dust, or is instead the result of a dirty viewfinder, mirror or lens. Most importantly though, you'll need to know how to clean the sensor, and how to minimize the risk of this happening again.
WHAT SENSOR DUST LOOKS LIKE
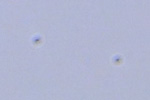
A dirty camera sensor is most apparent in smooth, light regions, such as bright skies:
 Photo Taken with a Dirty Camera Sensor
 100% Crop of Dust
Move your mouse over the 100% crop on the right to more easily see all the dust spots.
The exact appearance can change depending on the nature of the dust, image content and exposure settings (see f-stop example below), but will likely look similar to the above example. However, even if the dust isn't immediately apparent, it still reduces image quality by decreasing contrast. In the above example, note how some of the spots are much fainter than the others (look closely — there are at least eight).
Dust appears as diffuse spots because the particles themselves aren't actually sitting on the camera sensor's photosites — they're instead located slightly above the sensor, on the outermost surface of the sensor's filters:
 |
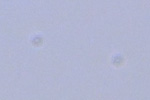 |
| f/8.0 | f/16 | f/22 |
Try moving your mouse over the different f-stop values above.
Red/green row represents actual photosites, and light blue horizontal strips represent anti-aliasing filter, microlenses, anti-reflective coatings and IR filter, amongst other potential layers.
The right image is an actual (cropped) photo of dust spots against a clear sky.
This causes the particle to cast a shadow, which is what we're actually seeing in the image (not the dust itself). This is also why lower f-stop values make dust shadows more diffuse, since this light reaches the sensor over a wider angle, and therefore more easily passes around the sides of the particle.
HOW TO KNOW IT'S ACTUALLY SENSOR DUST
Just because you see spots in your viewfinder and/or images, this doesn't necessarily mean you need to clean your camera sensor. Other sources of dust include:
(1) Viewfinder focusing screen and SLR mirror. This type of dust is clearly visible in the viewfinder, but fortunately doesn't alter the image file.Try looking through your viewfinder and changing the f-stop (while holding the depth of field preview button).Viewfinder dust will appear the same size regardless of the f-stop.


(2) Front or rear of your lens. This one is a little trickier to diagnose because spots on your lens may also impact your image. Try changing your camera lens to see if the spots remain. Lens spots generally appear larger and more diffuse (than sensor dust), and are usually only visible with wide angle lenses at high f-stops (near f/22+).


In either case, dust will become more apparent when you aim your camera at a clear sky or light-colored wall. If neither of the above is true (and you're still seeing spots in your images), it is safe to assume that the dust culprit is your camera's sensor.

example sensor dust map
OPTIONAL: How to Locate Sensor Dust. While sensor dust is never ideal, sometimes it's helpful to know just how dirty the sensor really is. Are there more spots than you thought? Are these near the middle of the frame — potentially appearing unexpectedly with high f-stop portraits — or are they just at the edges? Some dust is often acceptable when weighed against the risk of scratching your sensor or SLR mirror during the cleaning process. The easiest way to assess the situation is to (i) aim your camera at a smooth, light background such as a white wall, (ii) defocus the lens (so the background appears smooth and textureless), (iii) apply a +1 or +2 stop exposure compensation and (iv) take a photo at your lens's highest f-stop setting (usually f/22 or f/32). The resulting image provides an excellent map of sensor dust.
To improve visibility, you can also increase the image's contrast using "auto levels," or you can drag the black point slider of the levels tool to the right while holding the ALT key (in Photoshop). Just be aware that your dust map is flipped compared to the physical dust positions; spots at the top of the image are created by dust at the bottom of the sensor, for example.
SENSOR CLEANING METHODS
A camera sensor should only be cleaned when absolutely necessary, since doing so carries a risk of harming your camera's sensor* or SLR mirror.
*strictly speaking, only the outermost layer of filters is what actually gets cleaned — not the camera sensor itself. This is good, because replacing this filter is much less expensive than a new sensor (it can usually be repaired by the manufacturer if you send your camera back).
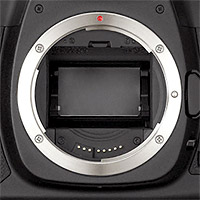
SLR camera sensor
Why is it risky? Cleaning requires flipping up your SLR mirror to give open access to the camera's sensor. If the camera's battery dies before cleaning is complete, the mirror can shut onto your hand and/or cleaning apparatus — thereby harming the mirror in the process. In addition, direct contact with the sensor can drag new or existing contaminants across the camera's surface — creating micro-abrasions or scratches.
Regardless, if you do decide that your sensor needs cleaning, the aggressiveness of one's cleaning strategy should also fit the severity of the problem. Listed in order of increasing effectiveness (but also of increasing risk), the most common types of cleaning devices include:
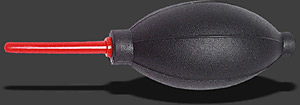
- Sensor Blower. This carries the least risk of harm because it never comes into direct contact with the sensor, but it's unfortunately also the least effective — especially if your dust adheres to the sensor's surface. This tool also has a high chance of just moving all of the dust around — potentially making the problem appear even worse. Only use blowers specifically designated for camera sensors; standard compressed air blowers may release a damaging coolant liquid.
- Sensor Brush or Sweep. This is often seen as a good compromise between risk and effectiveness. It will likely remove all but the most stubborn dust, and generally has little risk of scratching if it only makes light contact. There are even types which are designed to surgically remove individual particles (without having to sweep over the whole sensor). An added bonus is that you can also use a sensor brush to remove dust from your SLR mirror and focusing screen; just make sure to avoid inadvertent contact with either, and only clean the sensor on well charged batteries.

Example of a sensor brush (be careful - this isn't a normal painter's brush).
- Sensor Stamp or Pen. These make full contact with the sensor, but aren't dragged across the sensor surface, so they are less likely to cause a scratch. Their tip usually consists of deformable silicone, which gets pressed onto the sensor's surface, and is more likely to mold around the dust particle (and hold onto it) than the more rigid sensor surface. Try to avoid using products that instead work by using an adhesive, since this has the potential to leave a residue on the sensor surface.

Example of a sensor pen (although these can vary substantially in appearance).
- Sensor Swab, Wipe or Wand. This can remove even the most enduring particles, but requires careful technique. The device usually consists of a small, flat-edged paddle that is wrapped in a special lint-free tissue that's had sensor cleaning fluid applied. Make sure to get one with a width that's designed for your sensor size (cropped sensors generally need a narrower swab than full frame sensors).

Example of the paddle used by a sensor swab (without affixed lint-free tissue).
Sometimes several devices can be purchased together as a sensor cleaning kit, but if you only plan on purchasing or carrying one, the sensor brush or stamp is usually adequate. If you have more than one, it's often a good idea to try several tools in succession (although some skip the blower). Ideally you won't have to use a sensor swab, but if you do, this way most of the larger and more abrasive particles will have been removed prior to making full contact with the sensor.
HOW TO CLEAN YOUR SENSOR: GENERAL STEPS
We're not going to delve into the details of using each tool, since there are many variations. However, there are some universal steps, and knowing what cleaning might entail can give you a better idea of whether this is something you're comfortable doing yourself. The procedure below therefore provides the general steps needed when cleaning with sensor brushes and/or sensor swab tools. You are responsible for also consulting the instructions that came with your specific tool.


Light blue represents the tip of your sensor cleaning swab or brush tool, and orange is the path followed by this tool. The dark rectangular region represents the camera sensor.
Diagram assumes that your cleaning tool is the width of your sensor. Only follow this motion once; sweeping back and forth is both less effective and has more potential for damage.
- Prepare. Read through all these steps ahead of time so that you are familiar with each step and have everything necessary to perform each in succession. Make sure that you choose a block of 15-20 minutes where you are unlikely to be interrupted, and that your mobile phone has been turned off. It's also good practice to clean the camera body, lens and lens mounts with a damp cloth, since this dust could potentially end up on your sensor later on.
- Check Battery. Fully charge your camera battery if it has less than half its charge.
- Choose Location. Locate yourself in a clean environment with relatively still air.
- Arrange Tools. Have all necessary tools ready and easily accessible.
- Set Camera to Cleaning Mode. Set your camera to "manual cleaning mode" (or similarly named mode). Consult your camera manual if necessary.
- Position Your Camera. Remove any attached lenses and place your camera on its back on a flat surface, giving easy and visible access to the sensor.
- Clean Using One or More of the Tools Below.
a) Sensor Blower: Send several puffs of air into the camera body while the camera is facing downwards. After each puff, wait 5-10 seconds for any dust to settle out. Once complete, you'll usually also need to use one of the other tools below.
b) Sensor Brush: Gently place the bristled end of your brush at the edge of your camera sensor, and follow the motion shown in the diagram above. Apply only very light pressure — much less than if one were actually painting — since sensor brushes work by electrostatically attracting dust particles to their fibers, and not by actually scrubbing these off the sensor physically. Just try to whisk away the dust. Also, try to prevent the brush bristles from touching anything outside the sensor's edges, since this may transfer camera lubricants or other contaminants onto the sensor.
c) Sensor Stamp: Gently press the cleaning end of this tool against your camera sensor's surface, but avoid dragging this across the surface since it can leave streaks or scratches. If the stamp area is smaller than your sensor's area, use placements that minimize the number of times it needs to be pressed against the sensor.
d) Sensor Swab: Affix the cleaning tissue to the end of your cleaning tool, and place 2-3 drops of cleaning fluid on the tip of your tool (if either wasn't already performed the way it came). Gently place the tissue-covered end of your tool on the edge of the sensor and follow the motion shown in the diagram above. You shouldn't apply any more pressure than you ordinarily would when writing with a fountain pen.
- Verify Cleaning. Turn your camera off and re-attach your lens, then take a test photo of a smooth, light surface using your lens's highest f-stop value. Consult the "how to locate sensor dust" instructions at the start of this tutorial for additional details on performing this step. If the remaining dust is unacceptable, then you'll need to repeat the above steps — perhaps by using a more aggressive tool such as a sensor swab instead of a brush.
BEST PRACTICES FOR KEEPING YOUR SENSOR CLEAN
The old saying "an ounce of prevention is worth a pound of cure" certainly applies to camera sensor dust. If you're extra careful and minimize potentially contaminating events, then you'll likely require far fewer sensor cleans over the lifetime of your camera.

- Lens Changes. Try to avoid unnecessarily changing out lenses, and only do so in environments with clean, still air (when possible). Also make sure that you change lenses quickly, and that the camera sensor is facing sideways or downwards during the lens change (to reduce the chance of settling dust). Leaving the rear element of your lens exposed and upright will not only collect dust on the lens, but this dust may later transfer to the sensor when the lens is mounted.
- Self-Cleaning Sensors. If you're fortunate enough to have a newer digital SLR camera, many of these employ technologies that automatically clean the sensor every time the camera is turned on or off. This is surprisingly effective, but it cannot remove all types of dust, and these particles still accumulate within the camera body (thus increasing the risk of one of them landing on the sensor in the future). This feature therefore just decreases how often you'll have to physically clean the sensor.
ALTERNATIVES TO CLEANING IT YOURSELF
If the thought of cleaning the sensor makes you nervous, don't worry — it should — a lot can go wrong if you aren't careful. If you'd rather play it safe, here's some alternatives:
Edit out the spots. The clone and healing brush tools can be very effective ways of removing dust spots. However, this only works if the spots appear in easy to remove regions of your photo, and if the dust problem remains minor; eventually you'll still have to get the sensor cleaned. Editing and RAW development software sometimes also have dust map features which digitally edit dust spots in the same locations of each photo.
Have someone else clean the sensor. You can always send your camera to the manufacturer or a camera store so that it can be cleaned by a professional. If you plan on having a local store perform the cleaning, make sure to (i) verify up-front that they will insure your camera against any potential sensor damage, and (ii) check your camera by taking a test photo immediately after pick-up.
For further reading on this topic, also see the tutorial on digital camera sensors, which provides an overview of how digital camera sensors work.