FOCUS STACKING & DEPTH OF FIELD
Focus stacking is a powerful technique for extending a photo's apparent depth of field. It's perhaps most useful in close-up and macro photography, since the camera lens's highest f-stop is often insufficient to render everything in focus. It can even overcome the otherwise unavoidable sharpness loss from diffraction. However, focus stacking is also quite a complicated technique to master. Continue reading to learn more about this powerful tool.
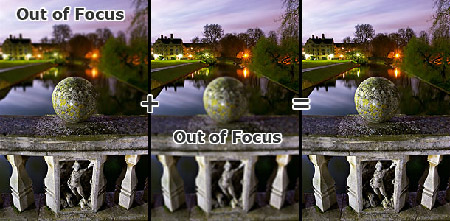
Photo taken under full moonlight atop Clare Bridge in Cambridge, England.
Two focusing distances were used: one for the sphere and the other for the background.
WHEN TO USE IMAGE STACKING
When a photographer requires more depth of field, they typically just increase the f-stop setting of their camera lens. While this is a simple and effective technique, choosing a higher f-stop also has its disadvantages. It increases the necessary exposure time, and in extreme cases, it can also reduce image sharpness due to diffraction. Furthermore, one might desire a greater depth of field than a particular lens's maximum f-stop is able to provide. Specific example scenarios may include:


- Landscape photography: one may wish to obtain a vast depth of field, while also avoiding softness at the focal plane due to diffraction. This can enable a much larger and sharper print than otherwise possible.
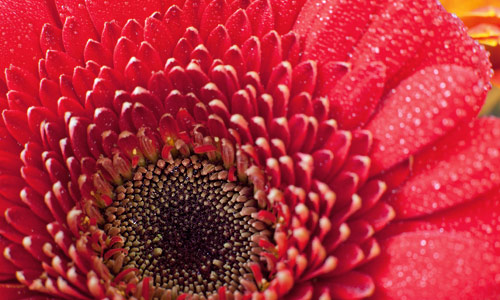
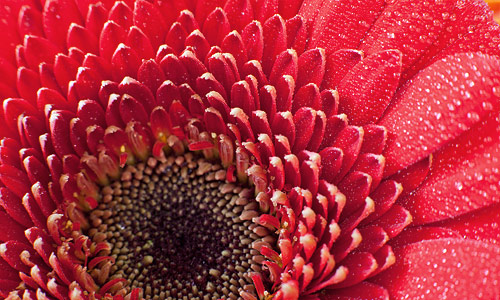
- Macro photography: one may wish to achieve a greater depth of field than otherwise obtainable using the lens's maximum f-stop (often f/22 or f/32 with SLR cameras).
- Low-light photography: one may want to avoid a prohibitively long exposure time. Alternatively, one may wish to freeze motion in part of their image (such as with a moving subject), but also to preserve an expansive depth of field in other parts of the photo (without resorting to using a flash).
What's the solution? To combine several separate images (aka "image stacking"). This avoids many of the disadvantages of using too high an f-stop, while also retaining the advantage of a large depth of field. In this article, we'll focus on a type of image stacking that merges several photos which were taken at different focusing distances — producing a single, extended depth of field composite (aka "focus stacking"). In the second part of this tutorial we'll instead focus on stacking images taken at different f-stops.
OVERVIEW
Focus stacking works in three general stages:


- Several photos are taken by gradually incrementing the focusing distance across the subject. The number of separate photos ranges from a couple (for two distinct layers of subject matter) to as many as dozens (for expansive scenes). In general, moving subject matter should be avoided.
- These photos are then aligned so that their content is overlaid pixel by pixel. This step is necessary even when using a tripod, since changing the focusing distance always causes misalignment (more on this later).
- A composite image is then created based on the sharpest regions from each of these separate photos. If the subject is composed of only a few distinct layers (such as the sphere example above), then this can be performed manually using layer masks. Otherwise Adobe Photoshop CS4+ or specialized software packages such as Helicon Focus, TuFuse or CombineZM are required.
STAGE 1: CAPTURING THE PHOTOS
The most important decision with focus stacking is choosing how many photos to take. This is influenced by the following factors:
| Required # of Stacked Photos | |
|---|---|
| When the # subject layers increases . . . | Increases |
| When the f-stop increases . . . | Decreases |
| When subject magnification increases . . . | Increases |
| When print/image size increases . . . | Increases |
In other words, all of the same principles which apply to depth of field also apply here. If your subject spans a large distance and you plan on making a large print, you'll need a high f-stop to achieve sufficient depth of field. The only difference is that now you have one more dial under your control: the number of stacked images. For example, now you can get away with a lower f-stop if you just stack more images (or vice versa).
One could estimate the number of photos from a formula, but it's probably best to instead develop an intuition for how many you'll need. If you almost had enough depth of field without focus stacking, start by stacking just 2-3 images with evenly spaced focusing distances across your subject, then see how this looks. The key is to experiment a lot when starting out. In the example below, one can see that three photos will be sufficient as long as the image isn't displayed any larger than it is shown here:


Note: Above photos have been pre-aligned to make the depth of field easier to compare.
Before alignment, the left image was slightly larger than that in the middle and right images
(see stage 2 for more on this topic).
Optimal Focusing Distance Spacing. The key is to ensure that the depth of field for each subsequent photo overlaps with the depth of field from the prior photo. This way no softness will be present in the final composite. More closely spaced focusing distances often produce more consistent and natural looking sharpness, but this can take a lot longer to capture and requires more storage space, so try to avoid overdoing it.
Be extra careful to avoid the wave-like depth of field which can result from focusing distances which are too widely spaced (as shown in the example to the left). As you can see, if the above example used a lower f-stop, more images would need to be stacked. Also try using the camera's "live view" rear LCD feature for more consistent focus distance spacing. For advanced stacks, you might want to connect your camera to a laptop (if supported) so that you can see an enlarged preview and control the focusing distance precisely.
If your subject spans the entire distance from your camera to the distant background, then you'll need to ensure that you've chosen a span of focusing distances that renders all of this in sharp focus. In this case, the focus stacking technique really needs to be an all or nothing approach, otherwise subjects can be rendered with an unnatural and abrupt depth of field. The only time you can get away with just a few focusing distances is when your subject is composed of distinct layers (such as the sphere example at the beginning).
Optimal F-Stop. Using higher f-stop values allows for more sparsely spaced focusing distances, but this can also decrease the sharpness of the final image. It's generally a good idea to choose as high an f-stop as possible without inducing visible softening due to diffraction. If in doubt, values of f/11-f/16 often work great with SLR cameras.
STAGE 2: ALIGNING THE PHOTOS
Unlike extending the depth of field by varying the f-stop, varying the focusing distance causes each individual photo to become misaligned. This is because the effective focal length of a lens actually changes slightly when one alters the focusing distance (see tutorial on macro lenses & extension). As a result, the angle of view also changes — giving images the appearance of zooming in or out when focusing near or far, respectively:
| Closer Focusing Distance (narrower angle of view) |
Farther Focusing Distance (wider angle of view) |
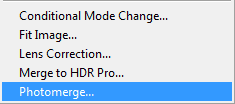
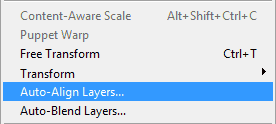
Special software therefore needs to re-align (aka "register") the separate images. Necessary software packages might include TuFuse, Helicon Focus, CombineZM or some combination of Adobe Photoshop's Auto-Merge and Auto-Align features. Fortunately, all of these produce very similar results when aligning images. In Photoshop, you can use either "File > Automate > Photomerge..." or "Edit > Auto-Align Layers..." as shown:
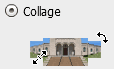
If you use Photomerge, then you can effectively perform stages 2 & 3 at the same time if you also check the box that says "Blend Images Together." If the photos were taken on a tripod (as they should be), then it's best to use the "Collage" option (shown on the right). If you're using another software package, this is equivalent to making sure that the software only repositions and resizes the images when aligning them.
If you use "Auto-Blend Layers," then you'll need to first ensure that all your photos are already pasted on top of each other as layers in Photoshop.
STAGE 3: MERGING & BLENDING THE PHOTOS
Merging the images requires determining which stacked photo contains the sharpest representation of each image region. In the example below, software was used to select and merge only the sharpest portions from each of the three focusing distances:
Focus:
| Near | Middle | Far |
 Sharpest Portion
 Final Composite
Unfortunately, image merging/blending quality can vary substantially depending on the image stacking software being used. With a simple subject that has well-defined layers (such as the above example), results will likely be similar. However, whenever the layers are irregular and highly intertwined, results can vary dramatically. You can always manually edit which photo contributes where, but this can be quite time consuming. It's therefore recommended that you first experiment with trial versions of whatever software you're considering.
In Photoshop, if you already used Photomerge to align the images in stage 2 above, then these photos may have already been merged if the "blend images together" box was checked. Otherwise you can blend these as follows:
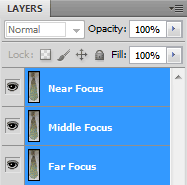 (1) Select layered photos
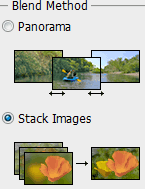 (2) Go to "Edit > Auto-Blend Layers..."
using the top menu,
then check "Stack Images."
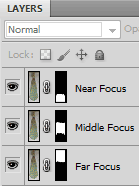 Resulting Layers
You'll be left with layer masks for each stacked photo (far right image above), so all you have to do is flatten the image (select all layers and go to "Layer > Flatten Image") and you'll be left with a sharp, extended depth of field photo. Just in case though, make sure to closely inspect the final result and edit the layer masks as necessary.
FOCUS STACKING: LIMITATIONS & ALTERNATIVES
Focus stacking is an amazingly powerful technique, but it definitely has disadvantages:
- It can be very time-consuming.
- It usually requires the subject matter to be motionless.
- It may require a precision focusing device (such as a focusing rail) when large numbers of photos need to be stacked (such as with extreme macro photography).
- It requires specialized software to align and merge/blend the photos.
Two excellent alternatives include:
- Extending Depth of Field by Stacking Images Taken at Different F-stops
This is simpler than focus stacking because each image doesn't have to be aligned, although it cannot extend the depth of field by as much. - Using Tilt Movements with a Tilt/Shift Lens to Reposition the Depth of Field.
This can capture moving subjects, but is limited to situations where the subject lies along a wedge-shaped region.