PORTRAIT FILL LIGHTING
A second light source — usually called a fill light or fill flash — can greatly improve portrait lighting. It reduces the depth of shadows and softens the appearance of facial features, amongst other traits. Best of all, a fill light is easy to create: either a simple on-camera flash or a reflector is often sufficient. However, a second light source can just as easily harm portraits. This tutorial therefore focuses on how to control the location and intensity of the fill light in order to produce a desired portrait appearance.


If you haven't done so already, also take a look at the first part of this tutorial:
Introduction to Portrait Lighting: One Light Source
OVERVIEW: TWO LIGHT SOURCES
With a single light source, the most important considerations were its direction and apparent size. While these have the same effect with a second light, they aren't typically varied independent of the main light. Instead, what's usually adjusted is the relative illumination of the secondary light compared to the main light. This controls how much the second light will "fill in" the shadows from the main light, and is why a secondary light is usually referred to as the fill light or fill flash:


note: diagrams show the effect of a fill light, not necessarily its ideal position (more on this later)
Perhaps the most common lighting scenario is to use an on-camera flash as the fill light, and sunlight as the main light. One could also use a secondary flash as a fill light in the studio, or could even use ambient light as the fill light and instead have the flash be the main light. There are many possibilities. The key is knowing how to control the qualities of your fill light — regardless of what source is being used to create it.
FILL LIGHT RATIOS
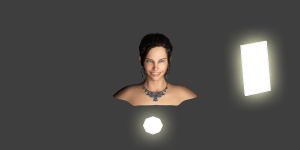
The terms "flash ratio" and "fill light ratio" describe* the relative amount of light from the main and secondary light sources, and effectively determine the overall contrast. For example, a value of 1:4 means that the fill light is a quarter the intensity of the main light. More balanced ratios produce weaker shadows:
 |
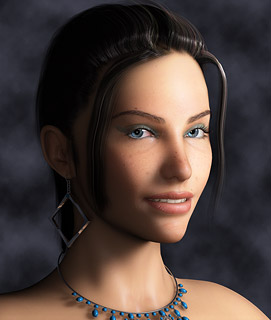
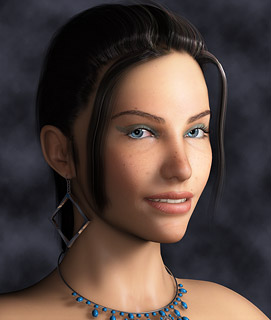
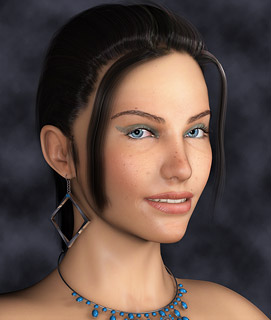
Fill Light Ratios: 0:1 no fill light |
| ↓ | |
 |
1:8 - 1:2 weaker fill light |
| ↓ | |
 |
1:2 - 1:1 stronger fill light |
 |
||||
| Choose a Fill Light Ratio: | ||||
| 0:1 | 1:8 | 1:4 | 1:2 | 1:1 |
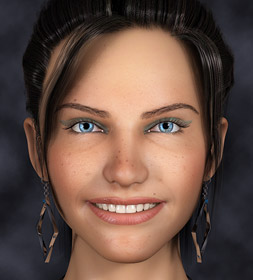
Portraiture typically appears better with a flash ratio near 1:2. This is strong enough to produce subtle shadows, but not so strong that it eliminates shadows entirely (causing the subject to be appear flat).
However, one should always be wary of such seemingly strict rules in photography. Less fill light is often used for dark, "low key" style portraits with well-defined shadows. Similarly, more fill light might be necessary to render a brighter "high key" style, or just to provide a softer appearance (such as with a photograph of a baby). When in doubt though, the 1:2 ratio is a safe starting point.
*Note: These terms can be a little confusing, because a "fill light ratio" refers to the ratio between the secondary and primary sources of light, whereas the "flash ratio" refers to the ratio between the light from the flash and ambient light. To make matters worse, sometimes the ratio is used to describe the ratio between total light (ambient+flash) and that from flash alone. The numbers are sometimes also reversed, but the smaller number always refers to the fill light. We'll stick to the same definition throughout this tutorial, and since we'll only discuss scenarios where flash is weaker than other light sources, both terms are synonymous.
FILL LIGHT LOCATION
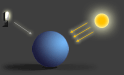
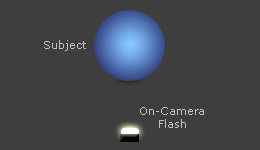
Unlike the main light source, the simplest location for a fill light is near the camera's line of sight ("on-axis"), but not so close that it appears in your image. That way, any shadows cast by the fill light won't be visible from the camera's perspective, so it won't matter if these appear hard (due to a small source). Perhaps the easiest way to achieve this type of fill light is to use a built-in or on-camera flash.
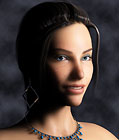
 On-Axis Fill Light
(shadows fall behind the subject)
 Off-Axis Fill Light
(shadows fall across the subject)
On the other hand, an on-axis fill light might be too restricting, and has a higher chance of producing direct reflections off the subject. Many therefore use a fill light which strikes their subject from a direction which partially opposes the main light ("off-axis"). This targets main light shadows more efficiently — even if the fill light ratio remains unchanged — and is therefore also less likely to affect the overall exposure.
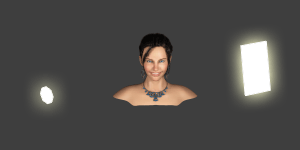
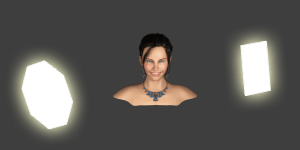
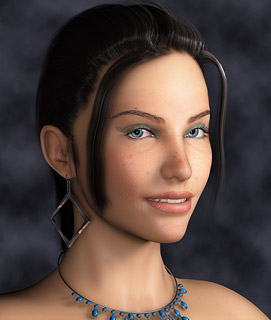
| Choose a Fill Light: |
Off-Axis Hard |
Off-Axis Soft |
On-Axis Hard |
The square light represents the main light, and the octagonal disc represents the fill light.
Above example uses a 1:1 fill ratio in order to improve visibility of fill shadows.
However, off-axis fill has its own disadvantages, with perhaps the worst being that one now has to worry about the appearance of shadows from the fill light. If these aren't made sufficiently soft, they can cause unrealistic-looking double shadows. To counteract this, the farther a fill light is placed from the camera's line of sight, the larger that light source needs to be. Move your mouse over the selections above to see this effect.
Note the second shadow to the right of her nose with the "off-axis hard" fill lighting. Also note how the on-axis fill light avoids producing double shadows even though it is a small (hard) source, but that it doesn't eliminate the shadows as thoroughly (even though it uses the same 1:1 fill light ratio).
Also keep in mind that off-axis fill lighting requires a more complex lighting arrangement, and is therefore usually reserved for portraits in a studio. An off-axis fill light also technically isn't a true fill light, since it cannot lighten all shadows visible to the camera — just those from its direction. For example, in the above portrait, the off-axis light is unable to reduce the shadows behind the hair on the upper right.
FILL FLASH CAMERA SETTINGS

Many only use flash when their scene has insufficient light for a hand-held photograph, but doing so misses out on perhaps an even more useful function: fill flash. Although it might seem counter-intuitive, portrait flash is perhaps most useful when there is plenty of sunlight. Fortunately, most cameras default to using their flash as a fill flash when the subject is well-lit* — but only if you force the flash to fire.
Cameras usually default to a flash ratio near 1:1, but this can be substantially off because it relies on your camera's metering system. To fine-tune this ratio, you'll want to apply flash exposure compensation (FEC). This modifies the amount of flash that your camera would otherwise emit, while leaving the other exposure settings unchanged.
*Note: Well-lit means that your camera doesn't deem camera shake to be a threat, which usually translates into having an exposure time that is shorter than about 1/60 of a second.
OTHER CONSIDERATIONS
Other important fill light techniques and considerations include:
Natural Fill Lighting. Thus far we've focused on scenarios where natural light is the main light source, and the camera's flash is used as the fill light. However, these roles could easily be reversed. The source of natural light usually needs to be soft though, such as from an overcast day or a subject in the shade. One also typically needs an off-camera or bounced flash in order for this to produce optimal results (see the discussion about lighting direction in the tutorial on portrait lighting).
Reflectors. These make a single light source illuminate a subject from a second direction. The reflection is dimmer than the main light, so reflectors are most commonly used as a fill light. An added benefit is that this light can easily have the same white balance as the main light, if desired. However, a disadvantage is that reflectors often don't provide enough light (even for a fill light). This is highly dependent on the reflectivity of the material, in addition to its distance from the subject. To increase illumination, reflectors are therefore usually placed as close to the subject as possible — often just outside the image frame.
Subject-Background Separation. With natural light portraits, a fill flash can help create additional subject-background separation, since the flash is likely to provide a lot more illumination to the (closer) subject than the (farther) background. You can control the strength of this effect by (i) moving closer to your subject and/or (ii) moving your subject farther from the background.
low ambient light
Ambient Light. All scenes have some amount of fill light — regardless of whether this has been added intentionally. Light from the main source bounces off walls and other objects, which collectively acts as a fill light. Shadows are therefore never fully black, and the actual amount of fill light is usually a little higher than that provided by your fill flash. However, studio lighting can still achieve very high contrast.
SUMMARY & FURTHER READING
Overall, the most important fill light choices are:
- Location: whether to place the fill near your camera's line of sight (on-axis), or off to the side (off-axis). On-axis fill is easier since one doesn't have to worry about how shadows appear, but off-axis fill gives more flexibility with placement and control over the appearance of reflections.
- Fill Ratio: the relative strength of your fill light, as compared to the main light. A good starting point is typically one part fill light for every two parts main light (denoted as a 1:2 ratio), but this will also depend on where your fill light has been located.
For background reading on this topic, also see part 1 of this tutorial:
Introduction to Portrait Lighting: One Light Source
For other similar topics, also visit the following tutorials:
- Camera Flash: Appearance
Discusses how to control the quality and appearance of light from a flash. - Our Interactive School of Portraiture (in the forums)
In particular, take a look at lesson 2: lighting and lesson 6: studio lighting.