
 Helpful Posts:
 Welcome back
We worked out in lesson 1 that we DON'T want to be shooting in harsh light because if gives unflattering hard shadows - so choosing a location in the shade gives us the soft light we need.
Unfortunately though, it's still not quite ideal -- for a couple of reasons:
1. It's likely to be flat (no direction), and
2. It's likely that your model is going to be illuminated to exactly the same degree as your background and thus we'll end up with a background that's just as dominant as our foreground, and that's not a good thing either.
So - what to do about it ...
Basically, we need to introduce some direction and at the same time try to illuminate our model more than our background so that when the camera meters off the model (foreground zone) we end up with more of a subdued background ... and if that happens to form some kind of natural vignette, then so much the better.
Two simple ways to achieve the foreground boost / direction that we need are to use either some flash (ideally through a shoot-through umbrella), or simply reflect some sunlight back onto the model. We'll probably cover flashes in a later lesson - but for now, we'll just stick with reflectors (a) they're cheap, and (b) they match the colour temperature of the main light PERFECTLY!) ...
Personally, I normally use 1 of two types either a plain white variety, or a silver variety. In most cases you can get these for just a few bucks from any photographic store or the likes of eBay etc - they're usually circular and in the region of 80cm to 110cm in diameter (but "fold" up much smaller) - a white / silver variety isn't as common - but you can usually get a 5 in 1 (black / white / silver / gold / translucent) for just a few bucks more which is probably the better investment as the other surfaces can also be put to good use. A variation on the basic theme can be bought for a bit more still in the form of what's called a "tri-grip"; they're kinda triangular in shape with a handle in one of the corners which makes it easier to position & hold with one hand (better for positioning higher), but at the end of the day, the regular round ones work pretty well anyway.
In an ideal world you need an assistant to hold and position the reflector, but it is possible to mount them on a reflector holder and attach this to a boom arm ... but not quite as convenient as it's not just a case of reflecting light back at the model - it's also desireable to impart a flattering lighting pattern in the process (eg loop lighting) which is quite fiddly when you're trying to adjust a stand. The other issue that's can be quite a problem with silver umbrellas is that the reflected light can be very hard for the model to tolerate - it's essentially like having the sun reflected into your eyes from a mirror; so having that done momentarily from a distance isn't too bad, but if the reflector is too close - or it's held in place further away on a boom arm - it's pretty hard on the model, and won't win you any favours. Personally I like to use the white reflector - you can get a LOT closer (and the closer the light source the BIGGER the light source = the softer the light) - and they don't fry eyeballs!
So that's your next assignment - to get yourself a reflector or two or five (and post a photo of it so I know you've actually done it!). Best choice is to grab a 5 in 1 - if you're on a tight budget then grab one with silver on one side and preferably white on the other (although mostly they'll be gold on the 2nd side) - but if you go for this option, be prepared to come up with SOMETHING white that you can cover it with to knock back some of it's efficiancy (thin white sheet / white paper). If you're on a next-to-nothing budget consider making something out of white card and/or crumpled oven foil.
Let me know when you're all set to go with your reflectors, and we'll move on to lesson 3
Any questions?
Results 1 to 20 of 55
-
6th August 2010, 11:07 AM #1

- Join Date
- Dec 2008
- Location
- New Zealand
- Posts
- 17,660
- Real Name
- Have a guess :)
"School of Portraiture" - Lesson 02 - Lighting
Last edited by Colin Southern; 6th August 2010 at 11:17 AM.
-
6th August 2010, 12:28 PM #2
- Join Date
- Jul 2010
- Location
- tehran , iran
- Posts
- 23
- Real Name
- omid
Re: "School of Portraiture" - Lesson 02 - Lighting
Is platinum also ok?!
thanks for this course and your time, i really appreciate it
-
6th August 2010, 06:26 PM #3
- Join Date
- May 2010
- Location
- Nashville Tennessee USA
- Posts
- 386
- Real Name
- Chriss Goyenechea


Re: "School of Portraiture" - Lesson 02 - Lighting
I found a really cheap one on amazon for $13 shipped in the US. Just got it yesterday and it looks that it will do it job, just got to see how long it would last me. hehehe.
http://www.amazon.com/110CM-Multi-Di...1118476&sr=8-3
-
6th August 2010, 09:44 PM #4Moderator

- Join Date
- May 2008
- Location
- Windsor, Berks, UK
- Posts
- 16,774
- Real Name
- Dave Humphries :)
Re: "School of Portraiture" - Lesson 02 - Lighting
Hi Colin,Any questions?
Are those 5 in 1 things one frame and 2 or 3 double sided (no doubt fiddly to fit) covers you need to insert the frame into?
i.e. can you use say, the white and the silver at same time (assuming they're not opposite sides of one item), or does the lack of a second frame prevent that?
EDIT: Mind you, at the price Chriss found, just buy two!
Thanks,
-
6th August 2010, 10:23 PM #5
- Join Date
- Dec 2008
- Location
- New Zealand
- Posts
- 17,660
- Real Name
- Have a guess :)
Re: "School of Portraiture" - Lesson 02 - Lighting
If it reflects light and doesn't alter the colour temperature of the light then I'm sure it'll be fine Originally Posted by omidrezatabatabaie


-
6th August 2010, 10:24 PM #6
- Join Date
- Dec 2008
- Location
- New Zealand
- Posts
- 17,660
- Real Name
- Have a guess :)
Re: "School of Portraiture" - Lesson 02 - Lighting
Arrrgh - unfortunately the $13 dollar ones from Amazon don't work if they're shipped in the United States - sorry! Originally Posted by Crovean
(just kidding!)
-
6th August 2010, 10:27 PM #7
- Join Date
- Aug 2009
- Location
- Canada
- Posts
- 3,113
- Real Name
- Wendy
Re: "School of Portraiture" - Lesson 02 - Lighting
I managed to find someone to hold the reflector, but couldn't dig up another person for the model. Should be able to do that by the time I need to though. The word is out now and the reflector holder said to let her know when I needed an assistant and she would find a model too. Hope they don't start lining up.

#1 the reflector - it's a 5 in 1. White and gold reversible to black and silver. The frame is a diffuser. Dave, the covers are not fiddly at all. It's very easy to change from one to the other, but you can only use 1 at a time.

#2 & 3 Trying to show the reflection. Time of day was wrong for either of my original backgrounds, but this is just a test run. I'll try to keep the camera straight for the next exercise and will shoot on an angle.


-
6th August 2010, 10:31 PM #8
- Join Date
- Dec 2008
- Location
- New Zealand
- Posts
- 17,660
- Real Name
- Have a guess :)
Re: "School of Portraiture" - Lesson 02 - Lighting
Hi Dave, Originally Posted by Dave Humphries
I can't speak for all types, but my one has a translucent covering on a springy wire frame as the "key component" and then a "zipperable" jacket that can be put over it that gives (off memory) silver / gold (or black / white if you turn it inside out). If you twist it 360 degrees back on itself it coils back on itself to take up only a fraction of the original size, and then pops into a smaller cover for transport and storage. The jackets can be a bit tricky to zip up, but after a bit of practice one learns the right technique to get it zipped up (more brawn, less brain!).
-
6th August 2010, 10:37 PM #9
- Join Date
- Dec 2008
- Location
- New Zealand
- Posts
- 17,660
- Real Name
- Have a guess :)
Re: "School of Portraiture" - Lesson 02 - Lighting
Sorta / kinda ... it is possible to use the diffuser to fix dappled light and then have some other way of using the silver / white jacket to reflect light back into the scene. Not necessarily very artistic looking (ie duck tape it onto a couple of broom handles is just fine, so long as it works!), but at the end of the day, only the results matter Originally Posted by ScoutR
-
7th August 2010, 04:35 AM #10
- Join Date
- Dec 2008
- Location
- New Zealand
- Posts
- 17,660
- Real Name
- Have a guess :)
Re: "School of Portraiture" - Lesson 02 - Lighting
Hi Wendy, Originally Posted by ScoutR
Doing well - already I can see that your going to get some nice lighting by following the path you're on now. In the next lesson we'll look at lighting more closely, but if you want to experiment in the meantime, bring the chair forward a metre or two, and reflect the light onto any model you can bribe by positioning the reflector holder so the light is reflected back at the model from up high, and from about a 45 degree angle to your background (so ideally it illuminates the subject with directional light, but not the background, thus making them "pop").
In fact, face the chair 45 degrees to the left - get the model sitting on the BACK of the chair (if it's safe) - get them to keep their shoulders aligned with the direction the chair is pointing - then get them to drop their left shoulder (a little) and look back towards the camera while you take the shot. You can also rotate the camera about 20 degrees clockwise for a better look too.
-
7th August 2010, 04:36 AM #11

- Join Date
- May 2010
- Location
- In a bus somewhere in New Zealand
- Posts
- 795
- Real Name
- Kit, aka Slimtla
Re: "School of Portraiture" - Lesson 02 - Lighting
Sadly, Amazon won't let me buy camera gear from America, (insert grrr smilie) but there are a couple on TradeMe. There's a five-in-one 80cm, or a five-in-one 107cm that might just be affordable. The Engineer is very encouraging.
So, Colin, which would be better? I don't want to go for overkill if smaller will do.
-
7th August 2010, 04:45 AM #12
- Join Date
- Dec 2008
- Location
- New Zealand
- Posts
- 17,660
- Real Name
- Have a guess :)
Re: "School of Portraiture" - Lesson 02 - Lighting
Hi Kit, Originally Posted by Klickit
Just had a quick look - probably http://www.trademe.co.nz/Electronics...-308243779.htm is the best bet - relatively cheap - big - and the two surfaces. No diffuser ability, but that's something that can be got later anyway.
PS: You might save a few more dollars going to Photoshack directly - their website has to be about the worst kept secret on Trade Me! (I've dealt with them too by the way, and they're fine - quality wise their products aren't exactly "industrial strength", but they're OK, and no worse than anyone elses.
EDIT: Also found this -- bit more expensive, but also includes diffuser - probably the better deal if you can afford it.Last edited by Colin Southern; 7th August 2010 at 04:50 AM.
-
7th August 2010, 05:23 AM #13
- Join Date
- May 2010
- Location
- In a bus somewhere in New Zealand
- Posts
- 795
- Real Name
- Kit, aka Slimtla
Re: "School of Portraiture" - Lesson 02 - Lighting
Went for the second option as it was one of the one's I'd been considering. Clicked and paid for - now just have to see if it arrives before we leave in the middle of next week. Wrote the guy an email begging (almost) for quick service.
-
8th August 2010, 02:09 AM #14
- Join Date
- Dec 2008
- Location
- New Zealand
- Posts
- 17,660
- Real Name
- Have a guess :)
Re: "School of Portraiture" - Lesson 02 - Lighting
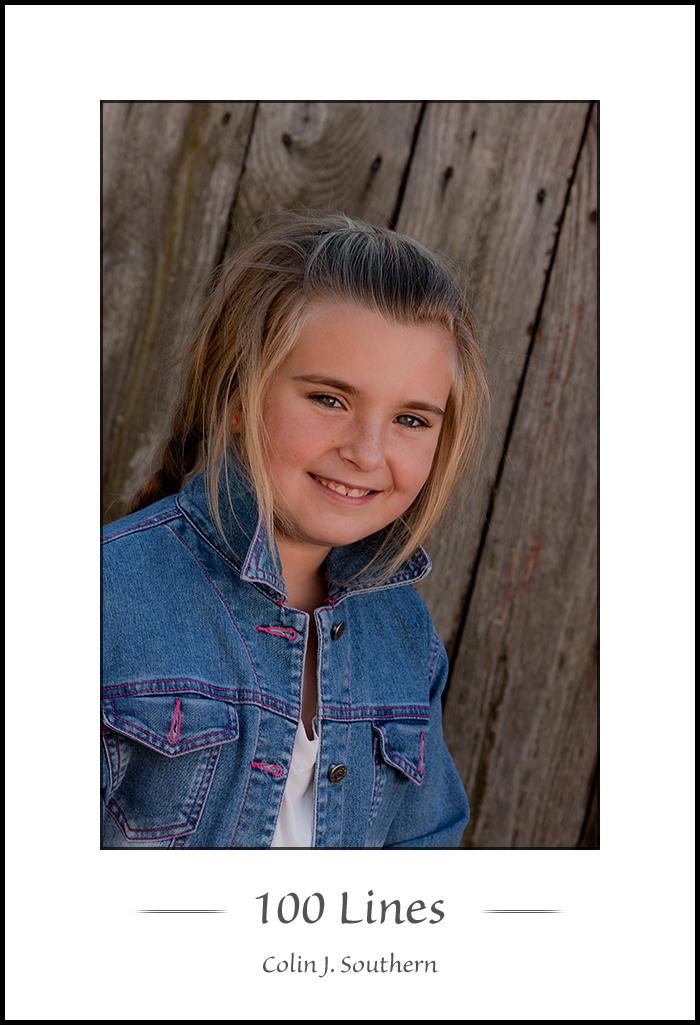
Thought I throw in a "quickie portrait" using what we've covered so far ...
We have an alleyway not too far from our house and since it runs pretty much North / South, it means that most of the time we have sun on one side, and shadow on the other. The alleyway is also lined with fences - and the good news is that the fence is different for each house - which means we photographers get treated to a moving parade of portrait backgrounds
Unfortunately the sun was pretty high - so I had to position the "model daughter" pretty close to the fence to keep her out of the sun - and for lighting I had #1 daughter holding a white reflector.
Minimal processing (usual stuff in ACR and a touch of teeth whitening).
Just to keep you all inspired as we work through this that the results are worth the effort!
-
8th August 2010, 02:45 AM #15
- Join Date
- Feb 2010
- Location
- Victoria Australia
- Posts
- 2,634
- Real Name
- Kay
Re: "School of Portraiture" - Lesson 02 - Lighting
Lesson 2 - yep we have a reflector....sadly willing useful subjects for holding same and/or standing in front of are all at 'work'
So I look forward to experimenting with that later, in the meantime - here is my faithful model substitute


"I wasn't really going to eat it - How could you think such a thing?"
-
8th August 2010, 08:04 AM #16
- Join Date
- Feb 2010
- Location
- Victoria Australia
- Posts
- 2,634
- Real Name
- Kay
Re: "School of Portraiture" - Lesson 02 - Lighting
Now that we know that the dog didn't eat my homework - here are my efforts using other family members...some of whom appear to have adopted a somewhat frivolous approach to my further education..


I will work on practice with the height & angle of reflector now

-
8th August 2010, 09:48 AM #17
- Join Date
- Dec 2008
- Location
- New Zealand
- Posts
- 17,660
- Real Name
- Have a guess :)
Re: "School of Portraiture" - Lesson 02 - Lighting
Hi Kay,
You must be keen - you're definately the first on the course to hire a professional model!
In all seriousness, looking pretty good - you're doing a lot of things right, and the things that could be improved we haven't covered yet -- so top marks so far.
I find that with portraiture it's the little things that make all the difference - so with that in mind, here's a few little things that I'd tweak ...
1. Get the reflector up much higher - we're used to looking at people lit by the sun - and we don't ever get sunlight at that angle. If you get the reflector higher you'll get a loop lighting patters across the face that angles down at around 30 to 45 degrees to the horizon - or - if you look at the catchlights in her eyes you want to see them at 10 o'clock, not 7 o'clock.
2. If you could move her a few feet to the right then I think you'd get out of the influence of the direct sunlight a bit more - you can see where it's just hit her right shoulder (and you can see the damage that direct light does) - but I think it's also illuminating her face more than the reflector is - which is washing out the skin tones (compare what you have to what I've tried to recover below -- with recovery set to 100).
3. Square on posing is somewhat "mugshot" posing (albeit the nicest mugshot I've seen in a long time!). It's pretty rare that I don't rotate the neck at least 30 degrees with relation to the shoulders. And at the same time, if you can get her to lean into the shot you'll be able to get the lines of the bricks at an angle other than horizontal, which will add more energy to the shot.
PS: Sorry - my edit has left her looking somewhat under-exposed - but I wanted to show you the difference in skin tone on her face to camera left. Being a JPEG I can't easily fix it.
PPS: Once we get finished with this course, you won't be able to take bad portraits of her if you try!Last edited by Colin Southern; 8th August 2010 at 11:37 AM.
-
8th August 2010, 09:36 PM #18
- Join Date
- Aug 2009
- Location
- Canada
- Posts
- 3,113
- Real Name
- Wendy
Re: "School of Portraiture" - Lesson 02 - Lighting
Great lesson you two. Thanks Kay and Colin. Kay I think the shots are super. I like the humour in the first 3 and the portraits look pretty darn good at this stage in the course.
Wendy
-
9th August 2010, 10:04 AM #19
- Join Date
- May 2010
- Location
- In a bus somewhere in New Zealand
- Posts
- 795
- Real Name
- Kit, aka Slimtla
Re: "School of Portraiture" - Lesson 02 - Lighting
Kay - those are lovely and the humour is a great bonus - it shines from her face.
Colin, I'm tardy, but today it just wasn't going to happen, both time and weather wise. Hopefully tomorrow will let us get outdoors again without suffering a drenching!
-
9th August 2010, 10:20 AM #20
- Join Date
- Dec 2008
- Location
- New Zealand
- Posts
- 17,660
- Real Name
- Have a guess :)
Re: "School of Portraiture" - Lesson 02 - Lighting
Ah - so you're still in the North Island then? Originally Posted by Klickit


