CAMERA LENS CORRECTIONS
Lens corrections help offset imperfections present in nearly every camera image. These might include darkening near the corners of the frame, otherwise straight lines appearing curved, or color fringes near edge detail. Even though these often aren't obvious in the original photo, the benefits of their removal almost always are. However, lens corrections also have the potential to make images worse if not carefully performed, and depending on the subject, some imperfections can actually be beneficial.
 |
|
| Before | After |
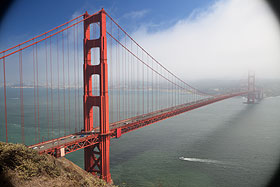
Results after vignetting, distortion and chromatic aberration correction.
Differences would be even more apparent if viewed at 100% on-screen.
OVERVIEW
The three most common lens corrections aim to address one of the following:


- Vignetting. This appears as a progressive darkening toward the edges of the image.
- Distortion. This appears as otherwise straight lines bending inwards or outwards.
- Chromatic Aberration. This appears as color fringing along high contrast edges.
However, lens correction software is typically only able to fix certain types of each imperfection above, so being able to identify them is key. The following sections describe the types and causes of each imperfection, when correction is possible, and how to minimize imperfections in the first place.
Most lens correction software will suffice for this tutorial, but common options include Adobe Camera RAW, Lightroom, Aperture, DxO Optics and PTLens, amongst others.
1. VIGNETTING
This describes the gradual fall-off of light towards the corners of your image, and is perhaps the most straightforward lens imperfection to observe and correct.
 |
|
| Internal Vignetting | Physical Vignetting |
|---|---|
 |
| Vignetting Removed |
|---|
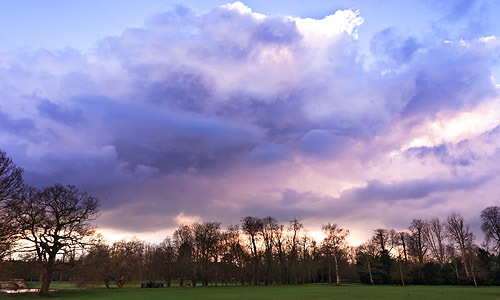
Note how internal vignetting is most objectionable only at the top left and bottom right due to the subject matter, even though the effect applies uniformly to all four corners.
Types & Causes. Vignetting can be grouped into two general categories:
- Physical Vignetting. Often not correctable except by cropping or manual brightening/cloning. Appears as a strong, abrupt darkening usually only in the very corners of an image. Caused by stacked/large filters, lens hoods or other objects physically blocking light near an image's edges.
- Internal* Vignetting. Usually easily correctable. Appears as a gradual and often subtle darkening away from the image's center. Caused by the inner workings of your particular lens and camera. It's typically most apparent at lower f-stops, with zoom and wide angle lenses, and when focusing on distant objects. Digital SLR cameras with cropped sensors are also less susceptible to vignetting because the darker edges get cropped out (when using full-frame lenses).
*Technical Note: Internal vignetting is comprised of two sub-categories: optical and natural vignetting. The first can be minimized by stopping down your lens (using a higher f-number), but the second is independent of lens setting. Natural vignetting is therefore unavoidable, unless one is able to use a lens with a narrower angle of view, or a specially-designed corrective filter that discards light toward the image's center (uncommon except perhaps with large format cameras).

vignetting correction sliders in photoshop
Correction. Vignetting can often be fixed using a single "amount" slider, although you can sometimes also adjust the center of the vignetting correction using a "midpoint" slider (but this is rarely needed). However, correction will increase image noise toward the corners, because digitally brightening an image amplifies both the signal and the noise equally.
Artificial Vignetting. Some photographers actually add vignetting to their images in order to draw attention to a central subject, and to make the frame's edges appear less abrupt. However, you'll want to do this by applying the vignetting after any image cropping (sometimes called "post crop vignetting").
2. DISTORTION: BARREL, PINCUSHION & PERSPECTIVE
This can give otherwise straight lines the appearance of bending inward or outward, and can influence the depiction of depth:


Types & Causes. The most common categories of image distortion include:
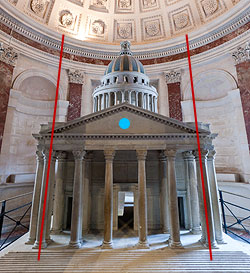 Perspective "Distortion"
Blue dot represents direction of camera;
red lines mark converging parallel lines.
- Pincushion Distortion. Appears when otherwise straight lines curve inward. Typically caused by telephoto lenses, or at the telephoto end of a zoom lens.
- Barrel Distortion. Appears when otherwise straight lines curve outward. Typically caused by wide angle lenses, or at the wide end of a zoom lens.
- Perspective Distortion*. Appears when otherwise parallel lines converge. Caused by the camera not facing these parallel lines perpendicularly; with trees and architecture, this usually means that the camera isn't pointed at the horizon.
With landscapes, distortion of the horizon and trees are usually most detectable. Placing the horizon along the center of a photo can help minimize the appearance of all three types of distortion.
*Technical Note: Perspective distortion isn't technically a true distortion because it is a natural characteristic of 3D vision. We see it with our own eyes, but our mind knows the correct 3D positioning of objects and therefore doesn't perceive these lines as converging. For more, also see the tutorials on wide angle lenses and using tilt/shift lenses to control perspective.
Correction. Fortunately, each of the above types of distortion is correctable. However, this should only be performed when necessary, such as with subjects that include straight lines or are highly geometric. Architectural photography is often most sensitive, for example, whereas many landscapes aren't noticeably affected.
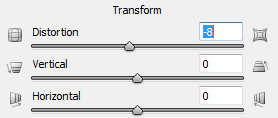
distortion correction sliders in photoshop
Editing software usually provides sliders for barrel/pincushion and perspective distortion in the vertical and horizontal directions. However, make sure to use the grid overlay feature (if available) so that you can more easily assess whether editing has made lines straight and parallel.
Disadvantages. Distortion correction usually requires cropping out curved edges of the corrected frame, which can influence composition. Correction also redistributes an image's resolution; with pincushion removal, the edges will appear slightly sharper (at the expense of the center), whereas with barrel removal the center will instead appear slightly sharper (at the expense of the edges). With wide angle lenses, barrel distortion is actually a helpful way of offsetting the corner softening that is common with these lenses, for example.
3. CHROMATIC ABERRATIONS
Chromatic aberration (CA) appears as unsightly color fringes near high contrast edges. Unlike the other two lens imperfections, chromatic aberrations are typically only visible when viewing the image on-screen at full size, or in large prints.


Correction above effective because CA consisted primarily of the easily removable lateral type.
Types & Causes. Chromatic aberration is perhaps the most varied and complicated lens imperfection, and its prevalence is highly dependent on the subject matter. Fortunately, CA can be more easily understood by separating it out into at least three phenomena:


Technical Notes: Pure lateral CA happens when the color constituents of an image are captured at different relative sizes (but are all in sharp focus). With pure axial CA, the color constituents are the same relative size, but some are out of focus. With blooming, both of these may happen, but at the small-scale of the sensor's microlens instead of image-wide at the camera lens.
- Lateral Chromatic Aberrations. The most easily correctable. Appears as opposing dual-color fringing along a radial direction from the image's center, and increasingly so near the corners of an image. Colors are often cyan/magenta, along with potentially a blue/yellow component.
- Axial Chromatic Aberrations. Uncorrectable, or only partially with adverse effects elsewhere. Appears as a single-colored halo around all sides of high contrast detail, and varies less with image position. The halo is often purplish, but its color and size can sometimes be improved by slight front or back-focusing the lens.
- Sensor Blooming. Usually uncorrectable. A unique phenomenon of digital sensors that causes spillover highlight clipping — producing highly varied sensor-level color fringing that usually appears blue or purplish. It's most prevalent with sharp, clipped specular highlights on high resolution compact cameras. The classic example is the edges of tree tops and foliage against a bright white sky.
All images are comprised of some combination of the above types, although their relative prevalence can vary dramatically depending on image content and camera lens. Both lateral and axial CA are more apparent with inexpensive lenses, whereas blooming is more apparent with older compact cameras; all are more visible at higher resolutions.
Note: Although axial CA and blooming typically occur uniformly around all edges, they may not appear equally in all directions, depending on the color and brightness of that particular edge. This can often cause these to be mistaken for lateral CA. Lateral and axial CA are sometimes also called transverse and longitudinal CA, respectively.
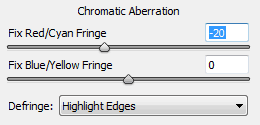
chromatic aberration sliders in photoshop
Correction. Reducing chromatic aberrations can make an enormous difference in sharpness and image quality — especially near the edges of your frame. However, only some components of CA can be mostly removed. The trick is to identify and apply the appropriate tools for each component separately — without making the others worse. For example, reducing axial CA in one region (by mistakenly using lateral CA tools) will usually make its appearance worse in other regions.
Start by using a high contrast edge near the image's corner, and view at 100-400% on-screen to gauge correction effectiveness. It is often best to start with lateral CA, using the red/cyan then blue/yellow adjustment sliders, since this is most easily removed. Then, whatever remains has to be the combined result of axial CA and sensor blooming, which can be reducing using the "Defringe" tool in photoshop. Regardless of which settings you start off with though, the key is to experiment.
 Original at 400%
 After Lateral CA
Removed
 After Blooming &
Axial CA Reduced
Crop is from the upper left of the water sunset image above.
Don't expect miracles though; some blooming and axial CA will almost always remain. This is especially true with light sources at night, stars and direct reflections off of metal or water.

")
AUTOMATED LENS CORRECTION PROFILES
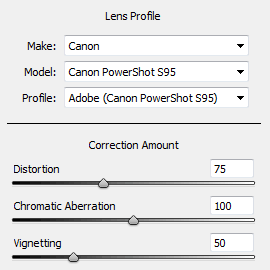
Modern RAW development software often has the ability to perform lens correction using pre-calibrated parameters for a broad range of camera and lens combinations. This can be an enormous timesaver if available. Adobe Camera RAW (ACR), Lightroom, Aperture, DxO Optics and PTLens all have this capability in their most recent version.
Don't be afraid to change these from their default of 100% (full correction). Some might prefer to retain a little vignetting and distortion, but to fully correct for chromatic aberrations, for example. With CA though, best results are ordinarily achieved by followed this up with manual fine-tuning.
If you're using lens correction as part of your photo editing workflow, the order in which it's performed can impact results. Noise reduction is usually more effective prior to CA removal, but sharpening should be performed afterwards since this can harm CA removal. If you're using RAW development software though, don't worry about the order since these will be intelligently applied.
FURTHER READING
For similar topics, also visit the following tutorials:
- Digital Photo Editing Workflow
A good way to see how lens corrections fit in amongst all the other editing steps. - Camera Lens Quality: MTF, Resolution & Contrast
An overview of all other lens aspects contributing to lower image quality. - Understanding Camera Lenses
Includes an interactive lens quality visualization tool at the start.