COMMON OBSTACLES IN NIGHT PHOTOGRAPHY
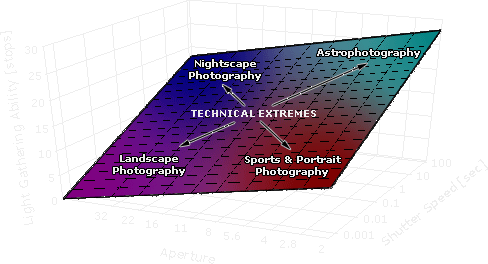
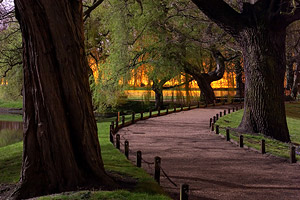
Night photography has the ability to take a scene and cast it in an unusual light — much like the "golden hour" surrounding sunrise and sunset can add an element of mood and uniqueness to a sunlit scene. Just as how sports and landscape photography push the camera's limits for shutter speed and aperture, respectively, night photography often demands technical extremes in both (see below).
Due to lack of familiarity and since night photos are often highly technical, many photographers simply put their camera away and "call it a day" after sunset. This section aims to familiarize the photographer with obstacles they might encounter at night, and discusses how to surmount many.
BACKGROUND
Night photography is subject to the same set of constraints as daylight photography — namely aperture, shutter speed and light sensitivity — although these are all often pushed to their extremes. For this reason, the abundance and diversity of night photography has been closely tied to the advance of photographic technology. Early film photographers shied away from capturing night scenes because these require prohibitively long exposures to maintain adequate depth of field, or produced unacceptable amounts of image noise. Furthermore, a problem with film called "reciprocity failure" means that progressively more light has to reach the film as the exposure time increases — leading to diminishing returns compared to shorter exposures. Finally, even if a proper exposure had been achieved, the photographer would then have to wait for the film to be developed to assess whether it had been captured to their liking — a degree of uncertainly which is often prohibitive after one has stayed up late and spent minutes to hours exposing each photo.
TRADE-OFFS IN DIGITAL NIGHT PHOTOGRAPHY
Fortunately, times have changed since the early days of night photography. Modern digital cameras are no longer limited by reciprocity failure and provide instant feedback — greatly increasing the enjoyment and lowering the risk of investing the time to take photographs at odd hours.
Even with all these advances, digital night photography is still not without its technical limitations. Photos are unavoidably limited by the trade-off between depth of field, exposure time and image noise. The diagram below illustrates all available combinations of these for a typical night photo under a full moon, with constant exposure:
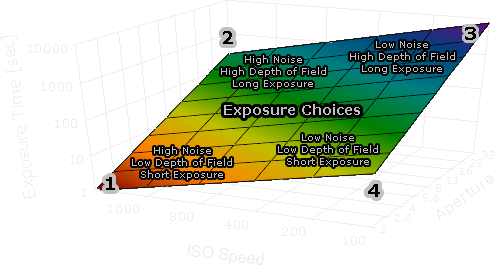
Note the trade-off incurred by moving in the direction of any of the four scenarios above. Most static nightscape photos have to choose between scenarios 2, 3 and 4. Each scenario often has a technique which can minimize the trade-off; these include image averaging, stacking and multiple focal planes (to be added). Also note how even the minimum possible exposure time above is one second — making a sturdy camera tripod essential for any photos at night.
The diagram does not consider additional constraints: decreased resolution due to diffraction and increased susceptibility to fixed pattern noise with longer exposures. Fixed pattern noise is the only disadvantage to progressively longer exposures in digital photography (other than also possibly being impractical), much like the trade-off of reciprocity failure in film. Furthermore, moon movement and star trails (see below) can both limit the maximum exposure time.
IMPORTANCE OF MOONLIGHT
Just as how daylight photographers pay attention to the position and angle of the sun, night photographers should also pay careful attention to the moon. A low-laying moon can create long shadows on cross-lit objects, whereas an overhead moon creates harsher, downward shadows.
An additional variable is that the moon can have varying degrees of intensity, depending where it is during its 29.5 day cycle of waxing and waning. A full moon can be a savior for reducing the required exposure time and allowing for extended depth of field, while a moonless night greatly increases star visibility. Furthermore, the intensity of the moon can be chosen at a time which provides the ideal balance between artificial light (streetlamps) and moonlight.
Gauging exposure times during a full moon can be tricky; use f/2.0 and 30 seconds at ISO100 as a starting point (if subject is diffuse and directly lit), then adjust towards scenarios 1-4 accordingly.
Another factor rarely noticed during daylight is movement of the light source (sun or moon). The long exposure time required for moonlight photography often means that the moon may have moved significantly over the course of the exposure. Moon movement softens harsh shadows, however too much movement can create seemingly flat light.
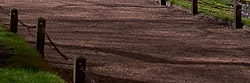
 Photograph Under a Full Moon
 Choose Exposure Time:
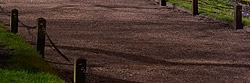
| 1 minute | 4 minutes |
Note how the 1 minute exposure above clearly shows high contrast and shadows from even the smaller branches, whereas the 4 minute exposure is at lower contrast and only shows the larger branches. The choice of exposure time can also vary by much more than a factor of four — greatly exaggerating the above effect.
Shots which include the moon in the frame are also susceptible to moon movement. A rule of thumb is that the moon appears to move its own diameter roughly every 2 minutes. As a result, it can quickly appear elongated if this exposure time is approached.
VIEWFINDER BRIGHTNESS
Properly composing your photograph in the viewfinder can be problematic when there is little available light. Even if you intend to expose using a small aperture, a lens with a large maximum aperture can greatly increase viewfinder brightness during composure. To see the effect of different apertures, manually choose an aperture by pressing the "depth of field preview" button (usually located on camera at base of lens).
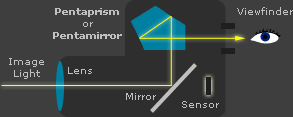
The way a SLR camera redirects light from the lens to your eye can also affect brightness. Cameras with a pentaprism (as opposed to pentamirror) ensure that little light is lost before it hits your eye, however these often increase the cost of the camera significantly. Larger format sensors also produce a brighter viewfinder image (such as full frame 35 mm, compared to 1.5-1.6X or smaller crop factors) . Finally, ensure that you give ample time for your eyes to fully adjust to the decrease in light — especially after standing in stronger light or using a flashlight.
INFLUENCE OF MIRROR LOCK-UP
Mirror lock-up (MLU) is a feature available in some SLR cameras which aims to minimize camera shake induced by mirror-slap (which produces the characteristic snapping sound of SLR cameras). It works by separating the mirror flip and aperture opening into two steps. This way, any vibrations induced by the mirror have time to settle down before the exposure begins.
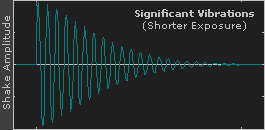
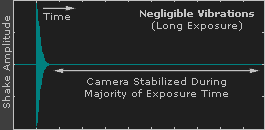
Mirror lock-up can drastically increase sharpness for exposure times comparable to the settling time of the mirror (~1/30 to 2 seconds). On the other hand, mirror shake is negligible for exposures much longer than this; therefore MLU is not critical for most night photography. When forced to use wobbly tripods (never desired) or long focal lengths, the stabilizing time can increase significantly (~8 seconds).
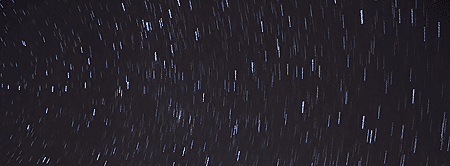
APPEARANCE OF STAR TRAILS
Even modestly long exposures can begin to reveal the rotation of stars in the sky. Using a longer focal length and photographing stars far from the north star increase the distance stars will move across the image. This effect can create a dizzying look, however sometimes these streaks detract from the artistic message if stillness and tranquility is the desired look.
 |
||
| Close to North Star | → | Far From North Star |
Normal focal lengths (28-50 mm) usually have minimal star movement if exposures are no longer than about 15-30 seconds. If star trails are desired, using a large aperture and higher sensitivity (ISO 200-400) can enhance the brightness of each streak.
FOCUSING AND DEPTH OF FIELD
Proper focusing is critical at night because small apertures are often impractical — therefore one cannot afford to waste mispositioning the depth of field (see hyperfocal distance). To further complicate focusing, night scenes rarely have enough light or contrast to perform auto focus, nor enough viewfinder brightness to manually focus.
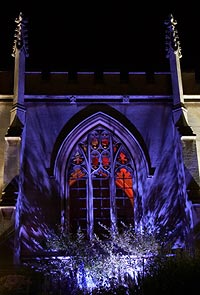
Fortunately there are several solutions to this focusing dilemma. One can try focusing on point light sources at a similar distance to the subject of interest. In the photo to the left, autofocus would be almost guaranteed by using the bright light at the bottom.
The central focus point is more accurate/sensitive in many cameras, and so it is best to use this (instead of the outer focus points) — even if using it requires having to recompose afterwards.
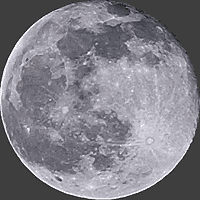
If you wish to autofocus at infinity, just aim your camera at the moon, autofocus, then recompose accordingly. Alternatively, bring a small flashlight since this can be set on the subject, focused on, and then removed before the exposure begins. If all these approaches are impractical, one could always resort to manual focus using distance markings on the lens.
METERING AT NIGHT
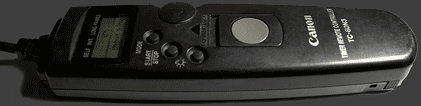
Unfortunately, most in-camera light meters become inaccurate or max out at about 30 seconds. Usually one can first meter using a larger aperture (so that the metered exposure time is under 30 seconds), then stop down as necessary and multiply the exposure time accordingly. Alternatively, one may need to carry an external light meter to achieve the most accurate metering. For exposure times longer than ~30 seconds, the camera needs to be set to "bulb mode" and an external timer/release device should be used (below).
Night scenes which contain artificial light sources should almost always have low-key histograms, otherwise these will have significant blown highlights. Metering these can be tricky if the camera's auto-metering fails; a good starting point is to meter off of a diffuse object which is directly lit by one of the light sources. If all else fails, be sure to bracket each image, or zero in on the correct exposure by using guess and check with the rear LCD screen.
What is a proper exposure at night? Unlike during daytime where the basis is (roughly) a 18% gray card, there is not really a consistent, commonly agreed upon way to expose night photos. One could "under-expose" to maintain the dark look of night, or could alternatively have the histogram fill the entire tonal range like a daytime shot. I generally recommend always fully exposing the image as if it were a daytime photo, and shooting in RAW mode. This way the exposure can always be decreased afterwards — while still maintaining minimal image noise because more light was collected at the digital sensor.
FURTHER READING
For similar topics, also visit the following tutorials:
- Making the Most of Natural Light in Photography
Discusses how different times of day influence subject appearance. - Moon & Night Photography Calculator
A useful tool for determining phases of the moon and when the sky becomes dark.