DIGITAL EXPOSURE TECHNIQUES
A lot of debate has surrounded what a "correct" digital exposure technique actually entails. Common strategies include (1) exposing "to the right," (2) slight under-exposure or (3) correct (standard) exposure. Each is motivated by a different aspect of how a digital image gets recorded, and they can have a big impact on the quality of your photos.
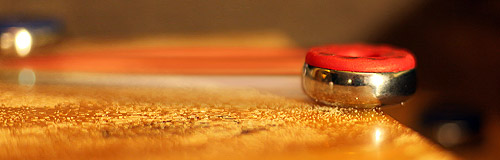 Digital exposure is a lot like shuffleboard.
The disc needs to slide close to the edge, but it mustn't fall off.
image courtesy of livingonimpulse (but in a modified form)
CHARACTERISTICS OF DIGITAL PHOTOS
Three properties are the primary motivation behind the various exposure techniques:
I. Progressively darker tones have correspondingly higher image noise:
II. Progressively brighter tones are unrecordable beyond a certain intensity, causing textures to turn solid white ("clipped highlights"), or individual color channels to saturate:
III. Incomplete use of a camera's dynamic range reduces the number of recorded tones, and this problem is compounded by the fact that cameras capture disproportionately fewer dark tones compared to how we see with our eyes:
Note: the number of tones has been reduced for visibility, but the same trend applies.
The actual number and distribution of tones depends on the bit depth and gamma.
See the tutorial on gamma correction and digital tones for more on this topic.
The key is knowing how to control one's exposure to take advantage of these unique characteristics. Ideally, one would capture using a standard exposure that records the brightest tones possible, but without clipping. However, this isn't always practical, since (i) one often doesn't know the precise distribution of tones before pressing the shutter button, (ii) taking a second photo isn't always an option and (iii) fitting a standard exposure within the camera's dynamic range might not even be possible in the first place.
The decision is therefore one of strategy. Which of the above characteristics does one aim for, even if potentially at the expense of others? In the next three sections we discuss the relative merits of three such exposure strategies . . .
1. EXPOSE TO THE RIGHT (ETTR)

move your mouse over the image to compare it to a standard exposure


Advantages:
- Maximizes the number of tones recorded.
Note: many recent digital SLR cameras have RAW files which record tones with 14-bit precision, so this is less of a factor than it used to be. It is highly unlikely that a RAW image will have insufficient tones (and become posterized) as long as it isn't grossly underexposed.
See the tutorial on image posterization for more on this topic. - Minimizes image noise because lighter (and therefore less noisy) tones get darkened after exposure compensation is applied. The total reduction in noise will depend on how much the photo is able to be over-exposed without clipping.
Disadvantages:
- Has a high risk of clipping the highlights, especially in the individual color channels (which can lead to unrealistic color shifts).
- Requires more light than normal, and potentially a higher ISO speed
(which could mitigate any reduction in image noise from ETTR). - Makes judging/pruning photos more difficult since subjects will likely appear over-exposed (until exposure compensation is applied in post-processing).
- May require several shots (followed by histogram inspection) in order to position the histogram as intended. One also needs to look at the color histogram in order to avoid clipping in any of the individual color channels.
2. SLIGHTLY UNDER-EXPOSE

move your mouse over the image to compare it to a standard exposure

Advantages:
- Safeguards against blown highlights and clipped color channels.
- Requires less light than normal, potentially enabling a lower ISO speed
(which would offset any increase in image noise).
Disadvantages:
- Increases image noise because darker (and therefore noisier) tones get brightened after exposure compensation is applied.
- Images will likely appear darker than intended when viewing them in the camera.
- Fewer discrete tones are captured by the camera.
3. USE CORRECT EXPOSURE IN-CAMERA

A correct exposure is typically obtained whenever a middle gray tone within your scene gets recorded as a middle gray tone on the image histogram. Refer to the tutorials on image histograms: tones & contrast and camera metering for a background. However, there isn't always a "correct" exposure for every scene, since this also depends on your artistic intent (particularly for night and low-light photos).
Advantages:
- Images will likely have the intended brightness straight from the camera. This makes post-processing much simpler and also allows one to more easily judge "keepers" when viewing them on the camera.
- Doesn't require that you capture your images using the RAW file format.
Disadvantages:
- Still risks clipping the highlights or individual color channels when capturing very high contrast (or colorful) scenes, especially if the camera's metering mistakenly over-exposes a little.
HIGHLIGHT CLIPPING
Sometimes a little highlight clipping is OK and even looks natural. Specular highlights (such as reflections on metal or water), regions around the sun (such as in sunsets) and other direct light sources (such as street lamps) all appear perfectly fine when clipped. This is often the necessary cost of ensuring that everything else is sufficiently bright.
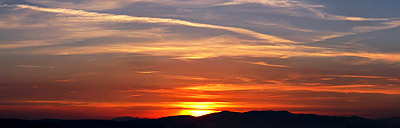
example of when it's acceptable to have blown highlights
In other situations, clipping might not be ideal, but it will likely be unavoidable — otherwise excessive noise or detail loss may occur in the darkest regions. In these cases, the difficult part is deciding on how much clipping is acceptable.
 Highlight Clipping
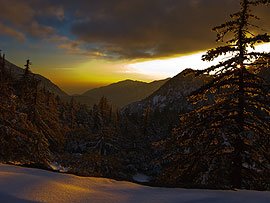 Highlight Clipping Appears Abrupt
Even After Negative Exposure Compensation
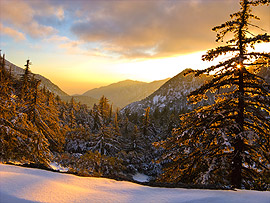
Also be careful to avoid clipping in the individual color channels (see the tutorial on histograms: luminosity & color), which can lead to unnatural color shifts if those regions require darkening during RAW development. This can happen very easily when trying to push the histogram as far right as possible. In the example below, even the slightest under-exposure was undesirable since this scene contained both bright clouds and extremely dark regions:
 Accidental Color Channel Clipping
 Unnatural Color Shift
When Trying To Recover Clipped Regions
The image on the left appeared fine using the camera's histogram because the cloud never became solid white. Even so, a single color channel was clipped, causing that region to be recorded using colors that weren't present in the actual scene. Fortunately for this photo, the color channel clipping wasn't a problem at the intended exposure.
CONCLUSIONS: OPTIMAL EXPOSURE STRATEGY
The optimal exposure strategy will likely be one that adapts based on the subject matter and shooting circumstances. The key is to have a good grasp of all the competing factors — image noise, tonal levels, clipped highlights and convenience — and to choose a strategy which gives you the highest number of usable photos, while also retaining the necessary image quality.
When weighing the consequences of blown highlights with those of slightly higher image noise, the former might make a photo unusable whereas the latter will reduce detail. Erring on the side of slight under-exposure would therefore be a good approach if it's important that a particular photo remain usable. That is, as long as (i) you're shooting in RAW and can apply exposure compensation later, (ii) it isn't practical to check the histogram (and potentially re-expose) afterwards and (iii) the scene isn't high-key (mostly light shaded objects, such as white snow). However, if the lighting is low contrast (such as on an overcast day), and if nothing is highly reflective, then there's little risk in using a standard exposure.
On the other hand, in special situations accidental under-exposure can be nearly as harmful as blown highlights, since this can destroy detail in the extreme shadows. In general, the greater the dynamic range, the more important it becomes to use as much of the right-hand side of the histogram as possible. For those types of scenes, one often needs to check the camera's histogram after each shot. This is particularly true if you intend to brighten the shadows in post-processing (such as simulating a graduated neutral density filter, or using shadow recovery tools), or with compact cameras, since these usually have both a lower dynamic range and more noise.
Alternative exposure techniques include:
- Auto Exposure Bracketing (AEB). Most cameras have an option to automatically capture both an under and over-exposed alternative, just after the first "standard" exposure. These can provide useful backups, but occupy more storage space.
- Image Stacking. Another way to both decrease image noise and improve the number of tones recorded — but without also risking clipped highlights — is to use image averaging. However, this requires tripod use and is really only for specialty shots.
- High Dynamic Range. This is a powerful new technique which has the potential to provide virtually limitless dynamic range — without ever clipping the highlights. See the tutorial on high dynamic range photography for more. This also requires a tripod.
